
A key part of WordPress core functionality is the widget system. It was originally designed to make it easy for bloggers to add content to a sidebar without coding. Today widgets are not only used for blog sidebars and in many modern themes they are used as content placeholders e.g. to add content to footers, sections of front pages etc. There many cool widget plugins available making this a powerful way to manage content in website placeholders. This is great but still for a person with limited HTML coding experience it can be a struggle to add a text widget with text, links, images etc. I know from experience that some people use the post editor to upload/insert images and style the text. Then they copy-paste the content into the text widget once it is ready. I’m not saying this is a bad practice, but there is a much simpler way to help your clients maintain text based content i widgets. The solution I prefer is to install the Custom Post Widget plugin . Once installed it allows you or your clients to display the content of a custom post, called a Content Block, in a widget. Besides making it a lot easier for clients to prepare content for the placeholders you lay out on the site, it also makes it possible to keep the overall layout, e.g. widget placements as an administrator task. Content is simply maintained using the Content Blocks pages. Let me show you how it works.
[exec]$filestr = file_get_contents(‘http://www.tripwiremagazine.com/googleadsensebelowmoretag.inc’);echo $filestr;[/exec]
Before I move on and show you how Content Blocks are used to add text to a sidebar I want to show you the standard WordPress text widget. As you can see to is just a simple text field where you can add text and hand-coded HTML. This way you can use the media manager to upload an image and add the HTML code to show it…. but it is not fast and simple. Further you can no revisions enabled and risk loosing the content if you are not careful.

When the plugin is installed you find a new menu item called Content Blocks. It is a bit strange that the plugin name “Custom Post Widget”. and the menu item “Content Blocks” is not the same, but it makes good sense since it is the Content Blocks you maintain here. The Plugin also installs a widget making it easy to add the Content Blocks to a sidebar.

[1]: This is where you find the administration pages for the Content Blocks and the “Custom Post Widget” plugin.
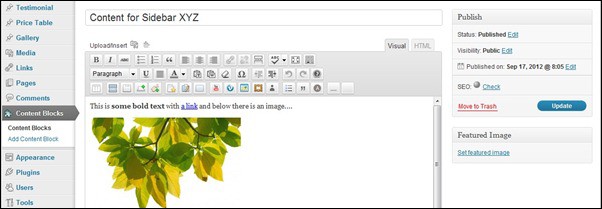
[2]: The title of the content block is worth considering a bit. While it is possible to show the title as a widget title it may be better to name the content blocks systematically and include some reference to where they are used. If you have 2-5 content blocks it is simple, but if you start creating a lot more good naming standards can make a lot easier to find the content block you want to update.
[3]: Here you add content to the Content Block the same way as you edit posts and pages.
[4]: Publishing a Content Block also works the same way as for posts and pages. Keep in mind that in order to choose a Content Block in the widget you need to make sure it is published.
Once you created a Content Block you will see it in the list as shown below. From here you can choose one to edit.

In order to use Content Blocks on the site they need to be inserted into Sidebars using the Content Block Widget as shown below.

[1]: Once added to a sidebar it is possible to choose from the currently published Content Blocks.
[2]: It is possible to show the title from the custom post (the Content Block) but you should consider carefully if it is necessary. You may also add a H2-H3 to the content itself. If this works out well all depends on the theme and how it renders the sidebars.
When the widget is added and active you will notice that the content added to the Content Block is now displayed on the site. The location of the Content Block is now in place and you can easily go in and edit it without working with widgets.

Hope you liked this mini tutorial and that you are going to participate in the discussion below. Also please share this article with your friends and coworkers 😉
Lars is passionate about web design, web development, SEO, social media and loves to look into new technologies, techniques, tools etc. and to write articles for tripwire magazine readers.