
If you have never translated a WordPress theme or plugin before you may find that first time you try it out… it is not that easy.
WordPress is certainly well prepared for localization and with the right tools and understanding in place you can do it fast and even help your clients take control themselves of all text displayed on their site. Todays WP Tip will help you understand the translation process. This will help you get started and to do it right the first time! Please leave a comment below and tell us your experience!
[exec]$filestr = file_get_contents(‘http://www.tripwiremagazine.com/googleadsensebelowmoretag.inc’);echo $filestr;[/exec]
WordPress localization / internationalization overview
WordPress have implemented a process called I18n for making an application ready for translation. At a high level I would like to illustrate the process like this:

Let quickly look at each step:
1: Code with Gettext strings
Any programmer implementing themes and plugins for WordPress should be aware of this and use the Gettext libraries whenever some text is coded into their source code. In stead of simply adding the text it need to be wrapped by a function call like this:
__('%s comments');
or like this, when text is to be echoed out.
_e('%s comments');
The example below is simply NO GO as it is a hard coding of the text that no one can change unless they are going all the way down to code level! Changes at this level is not what we want for several reason, but most importantly it prevents us from simple updates.
echo "%s comments";
2: The .pot file
With a utility callsed xgettext all original strings in the code can be extracted into a .pot file. Typically for popular themes and plugins the pot file already exist and can be used to translate right away. If you like to know the “technical names: .pot stands for Portable Object Template.
If the theme or plugin you use does not yet have .pot it .po files you can follow these steps on how to generate your first WordPress .pot file.
3: The .po file
A .po file is simply a .pot file where the translation for a specific language is added. To do this you need a translation tool. The translation tool is also used to turn the .po file into a .po file. I’ll cover this in more detail later in this post.
The .po and the .mo files are prefixed with a localization code e.g. da_DK for Danish, Denmark. For themes it is important to know that .po and .mo files should ONLY have the localization code in the name while for plugins the plugin file names start with the plugin name
e.g.
Theme: \wp-content\themes\<theme name>\<language file location>\da_DK.po
plugin: \wp-content\plugins\<plugin name>\<language file location>\<plugin name>-da_DK.po
For good order – the abbriviation stands for .po stands for Portable Object and .mo for Machine Object
Important before you start the time consuming task of translating all strings yourself make sure to look for any existing translations. Others may have started or even fully completed the work.
4: The .mo file
This file is a binary file optimized for quick access and is generated by a translation tool. It is the file WordPress reads to find translated texts and therefore it must be uploaded to or create on your server in the right location.
Turning on WordPress localization
WordPress localization is turned on by editing the wp-config.php file. You need to be careful when you start chaning wp-config.php if you are not sure what you are doing and your site is online. Otherwise just look for “define(‘WPLANG’….” and insert your target localization code. In this example it is Danish.
define('WPLANG', 'da_DK');
Once this setting is set WordPress will load and use any da_DK.mo files available on your site. If not a da_DK.mo file is not found for e.g. a plugin it will just show the original strings.
Translation Tools
You need a tool in order to effectively translate your .pot files and in the end to create the binary .mo file.
poEdit
A popular tool for this is poEdit. It works fine and I used it myself for the first sites I translated. However it is best when you mass translate before taking a site into production because you need generate a new .mo file and upload it every time you make a change. In poEdit the .mo file is generated / updated every time the .po files is saved.

Codestyling Localization
Recently I fould a free tool / WordPress plugin called Codestyling Localization and it is simply really cool. The main reason why I like it so much is that it allow me or my clients to access translation from the WordPress admin area. The interface is pretty good and allows for easy access to update any translated text for themes and plugins. For mass translation you may have a few more clicks compared to using poEdit, but still I prefer to use it. When your site is in production and you find a text that need to be updated it is so much easier.
Once installed Codestyling Localyzation is found under Tools->Localization
Once opened you see all the possible elements in your WordPress installation that support translation. This is WordPress itself, themes and plugins. You also see all the existing language files you can easily edit using this plugin.

One of the things I really like is the possiblity to start the translation process on the site.

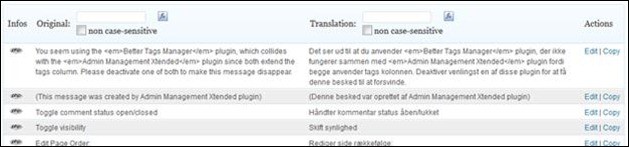
Once your translation files are created (or if you edit and existing) you will get the Translate Language File page. This page shows all entried to be translated and it is easy and quck to filter out specific entries if you are looking for a specific text to be changed.

The translate window open when you click an Edit link and simply gives your the original text and the text field where the translation is to be inserted. One cool feature is the possibility to use Google Translate to speed up the process. You should not rely on this 100% but for large texts it can be very time saving to see google suggestion first and then adjust when needed.

This is all for todays WP Tip. Please leave a comment if you have feedback, questions etc. and share the post if you like it!
Lars is passionate about web design, web development, SEO, social media and loves to look into new technologies, techniques, tools etc. and to write articles for tripwire magazine readers.


[…] Translating texts in themes and plugins is also important if you want a 100% translated website. This task should not be underestimated as some themes and plugins have hundreds of text snippets worked into them. To make this work for your website users you will also need a solution for switching the WordPress localization. […]
[…] Translating texts in themes and plugins is also important if you want a 100% translated website. This task should not be underestimated as some themes and plugins have hundreds of text snippets worked into them. To make this work for your website users you will also need a solution for switching the WordPress localization. […]
Hi,
Its hard to say.
But, this tutorial not for beginner.
Useful info – nize comprehensible description – is just about to translate a WP Theme for auto dealers from English into Danish language 🙂 – so, thanx for sharing
Great post! I still have a lot to learn in regards to this but hopefully you can post some more informative articles.
Using Codestyling Localization is pretty more easy but I think WordPress should make translating much more easier.. nice trick..
Great post ! thanks for sharing 🙂